How to Remove an user account in Vista

Have an account that you no longer need on your computer? You can delete it and still keep the desktop and personal files associated with the account by following these steps:

1. Log onto the computer using an account with administrator privileges.

2. Click the Start Button.

3. Click the picture associated with your account at the top of the menu.

4. Select Manage another account.

5. When the UAC box pops up, click Continue.

6. Select the user account that is to be deleted.

7. Click Delete the Account.

8. You will be asked if you wish to keep the files from the deleted account. To save the account’s desktop and personal files to your desktop, click Keep Files. This will place the files into a directory with the account’s name onto your desktop. Otherwise click the Delete Files button.

9. Click Delete Account.

How to Fix WordPress Posts Returning 404 Error

Usually in this scenario a user can access their WordPress admin area, their blog’s main page, but when accessing a single posts they get a 404 Not found error. First of all, don’t panic most of the time your posts are still there and completely safe. This usually happens if your .htaccess file got deleted or something went wrong with the rewrite rules. What you need to do is fix your permalinks settings.

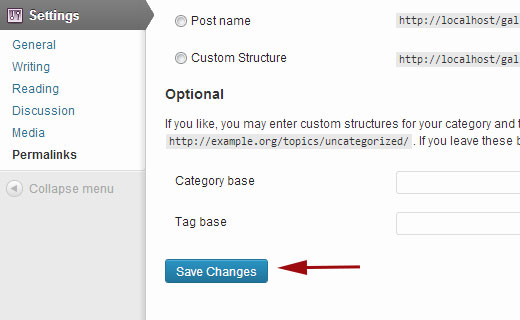
Go to Settings » Permalinks, and simply click on Save Changes button.

Update WordPress Permalinks settings

This will update your permalinks settings and flush rewrite rules. In most cases this solution fixes the WordPress posts 404 error. However, if it does not work for you, then you probably need to update your .htaccess file manually.

Login to your server using FTP, and modify the .htaccess file which is located in the same location where folders like /wp-content/ and /wp-includes/ are located. The easiest thing you can do is to temporarily make the file writeable by changing the permissions to 666. Then repeat the original solution. Don’t forget to change the permissions back to 660. You can also manually add this code in your .htaccess file:

01 # BEGIN WordPress 
02 <IfModule mod_rewrite.c> 
03 RewriteEngine On 
04 RewriteBase / 
05 RewriteRule ^index\.php$ – [L] 
06 RewriteCond %{REQUEST_FILENAME} !-f 
07 RewriteCond %{REQUEST_FILENAME} !-d 
08 RewriteRule . /index.php [L] 
09 </IfModule> 
10 # END WordPress

gmail to outlook

Access Gmail with Outlook Using IMAP

To set up seamless access to all your Gmail mail and labels in Outlook 2007 (you can also access Gmail with Outlook 2002 or 2003):

Make sure IMAP access is enabled in Gmail.
Select Tools | Account Settings… from the menu in Outlook.
Go to the E-mail tab.
Click New….
Make sure Microsoft Exchange, POP3, IMAP, or HTTP is selected.
Click Next >.
Type your name (what you want to appear in the From: line of messages you send) under Your Name:.
Enter your full Gmail address under E-mail Address:.
Make sure you include “@gmail.com”. If your Gmail account name is “asdf.asdf”, make sure you type “asdf.asdf@gmail.com” (not including the quotation marks), for example.
Make sure Manually configure server settings or additional server types is checked.
Click Next >.
Make sure Internet E-mail is selected.
Click Next >.
Select IMAP under Account Type:.
Type “imap.gmail.com” under Incoming mail server:.
Enter “smtp.gmail.com” under Outgoing mail server (SMTP):.
Type your Gmail account name under User Name:.
If your Gmail address is “asdf.asdf@gmail.com”, for example, type “asdf.asdf”.
Type your Gmail password under Password:.
Click More Settings ….
Go to the Outgoing Server tab.
Make sure My outgoing server (SMTP) requires authentication is checked.
Now go to the Advanced tab.
Select SSL under Use the following type of encrypted connection: for both Incoming server (IMAP): and Outgoing server (SMTP):.
Type “465” under Server Port Numbers for Outgoing server (SMTP):.
Click OK.
Now click Next >.
Click Finish.
Click Close.

Win XP won’t open Zip files

When try to extract files from any zip file:
1 the Windows XP Extraction Wizard opens
2 WINDOWS SECURITY WARNING shows up:
Windows has blocked access to these files to help protect your computer

Work around: try to open the zip from winzip

Vault Access in PW

Created a vault, but didn’t have access right. The other use has read/write right can see the vault but can’t delete. The owner can’t see it so can’t delete it too.

Solution: login into server as admin, change that user who can see the vault under ‘user settings’ –> Vault –> give the user ‘change permision or delete’ right. So the user can delete the vault.

Google Earth

If it starts with the option ‘start with openGL’ option in Win XP professional version, it gets error message “error, google earth needs to be closed’.

Solution: change to option ‘start with DirecX’. It is working

How To Change Internet Explorer’s Default Search Engine Setting

How To Change Internet Explorer’s Default Search Engine Setting

If you have Internet Explorer, and click the “Search” icon, it will default to Bing. If you would like to set Internet Explorer to something other than the default search engine choice, follow these directions.

1.Remember that Search button in the IE browser toolbar? If you haven’t clicked on it already, click it. The “Search Companion” window will open up on the left side of your browser

2.You’ll see a “Change Preferences” button about three-quarters of the way down the window. Click on it.

3.You will now see a window with the heading “How Do You Want To Use Search Companion?” You want to click the arrow that says “Change Internet Search behavior.”

4.After you click the arrow, you’ll be taken to the Internet Search Behavior window. There are two radio buttons to choose from. The first one gives you the option of continuing to search with Search Companion, or search with Classic Internet Search. Neither one give you any more screen real estate, so it is entirely up to you.

5.Below these Search Behavior options, you’ll see the box with various search engines listed. Just click on the one you want, and that’s the one that Search Companion will search with.

Search Companion

All you have to do to get rid of Search Companion is click on the X at the top right of the window. Some people really like Search Companion because it also can be customized. However, I don’t like how it hogs valuable real estate on the computer screen. My choice would instead be for Google Toolbar. It’s a free download and fits nice and snug right under the regular IE toolbar, and you can search Google without losing screen room.

Configure ProjectWise datasource for Single Sign On

Background
After following this procedure, when logged on to a Windows machine as a domain account that exists as a user in ProjectWise, the user will automatically be logged into the ProjectWise datasource in ProjectWise Explorer or Administrator

Steps to Accomplish
1.On the ProjectWise Integration Server, browse to the PW installation directory
c:\program files (x86)\bentley\projectwise\bin (Pre-SS4 versions)

c:\program files\bentley\projectwise\bing (SS4 + higher)

2. open dmsknrl.cfg in notepad

3. at the bottom of the file in the appropriate datasource section add the line “SSO=1”

example

[db0]
Description=datasource
Type=Microsoft SQL Server
InterfaceType=ODBC
Name=servername
DBUserName=sa
DBUsrPwdDecrypt=4
DBUserPassword=#UCEEM7s54ZRWqZt3RpaXREsuskgcxxv9+bzLUgGBqq5Butrg
SSO=1

PW login problem

A user can’t see the datasource. The error code is 58063

Even with the admin login, PW still can’t be logged in. After hardware checked, found a wireless connection for a device ‘IPAQ’ connected to an internal network for PM work. It creates a mask for this workstation.

It shows that there are two network connections on the workstation and changed the workstation IP address to different network from the server

The IP is 169.245.x.x

After unplugged the usb connection, PW works and the IP address is changed back to

198.162.xxx.xxx, same network as the server.

Subnet problem

The problem could be solved after adding the specific machine in the dmskrnl.cfg file.
The label on the left does not matter. You can add something like this:
PWCLIENT = 10.9.4.15 255.255.255.0
The first number is the ip address of the client; the second number is the subnet mask

Windows XP has an Internet Connection Firewall feature. After you have installed some hotfixes this feature is enabled automatical ly. As a result service ports are blocked. In order to open the ports, please go to My Network Places—>Local Area Connection—- >Properties—–>Advanced, here uncheck the “Internet Connection Firewall” checkbox. Reboot the system.

If you have WinXP S ervice Pack 2, as an alternative to disabling Internet Connection Firewall, you may instead add the SentinelLM service as an excep tion that does not get blocked. To do this, follow these instructions:

Click on Control Panel –> Windows Firewall.
On the Windows Firewall window, click on the Exceptions tab.
Click the Add Program button.
Click the Browse button on the Add a Program window and browse to your SentinelLM install directory–the default for version 7.2 is C:\Program Files\Rainbow Technolog ies\SentinelLM 7.2.0 Server\English
Select the lservnt.exe file and click Open.
You should now see lservnt.exe in the Progra ms and Services listing in the Exceptions tab.
Click OK and close out of the Windows Firewall window.
Reboot your computer.< CR>
You should now see your server listed if you look under Subnet Servers when running WLMAdmin.

DCOM or Schannel errors

msg: ‘A fatal alert was generated and sent to the remote endpoint. This may result in termination of the connection. The TLS protocol defined fatal error code is 51. The Windows SChannel error state is 900.’

In Group Policy Editor (run: gpedit.msc), went to Computer Configuration > Administrative Templates > System > Distributed COM > Application Compatibility and enabled “allow local activation security check exemptions”

No more Schannel or DCOM errors now!

disabling “Use TLS 1.0” in IE’s Advanced Option

Mapped error code: 58033

Mapped error code: 58033

Cannot remove document file. Either the document file has already been removed or another application is using the file. The file transfer may be stopped.

A regular file can’t be removed or checked out. It was also can’t be deleted from the storage area.

Solution:

1. removed the association with any software
2. rename the file extension, and save the changes
3. delete.

Limited Or No Connectivity Windows Errors

1.Determine whether your network access is functioning properly (that you can reach local network resources and the Internet). If you are using a broadband Internet and Windows XP Service Pack 2, this message is often a false error report. See Microsoft Knowledge Base article 892896 for details on how to work around this error appropriately.

If your network access is non-functional. continue to the following steps.

2.If your computer connects to the network through a broadband router , resetting (powering off and on) the router may resolve the issue. If not using a broadband router, or if resetting your router only temporarily resolves the issue and the error message re-appears later, continue to the following steps.

3.If connecting to your network using Wi-Fi and using wireless security, your WEP or other security key may not be set properly. Check the wireless security configuration on your computer’s network adapter and update if it necessary.

4.If connecting to your network using an Ethernet cable, your cable may have failed. Temporarily replace your network cable with a new one to determine whether this resolves the issue.

5.If using a broadband router and DHCP on your network, check your computer’s IP address to verify it is valid and not a private address that starts with 169.254. An invalid address of the form 169.254.x.x signifies your computer’s inability to obtain a usable IP address from your router.

To resolve DHCP configuration problems, proceed to the following steps.

6.Reboot your computer, router (if present) and broadband modem together, then re-test your connection.

7.If your connection remains non-functional, run the Windows Network Repair utility on your computer.

8.If your connection remains non-functional, update your router settings to change from dynamic to static IP address configuration, and set an IP address on the computer appropriately.

9.If your connection remains non-functional, unplug your router and connect the computer directly to your broadband modem. If this configuration is functional, contact the manufacturer of your router for additional support.

10.If your computer is connecting to your network directly through a broadband modem, or if your Internet access remains non-functional after following the instructions above, contact your Internet provider for support.
AMD card display problem

If video card built by AMD/ATI,

If so, the Vari-Bright feature must be on. To fix this go to:

1. AMD Vision Engine Control Center (or AMD Catalyst Control Center)

2. Power

3. PowerPlay

4. Uncheck the “Enable Vari-Bright” option.

download the AMD Catalyst Control Center (AMD Vision Engine Control Center on other laptop) at the AMD/ATI website
here:

hxxp://support.amd.com/us/gpudownload/Pages/index.​aspx

and that will fix your problem.

D-Link Router

Instructions

1 Remove the cable that is attached to the “Internet” port on the rear of your DSL or cable modem.

2 Plug the Ethernet cable into the “Internet” port on the modem and plug the other end of the cable into the “Internet” port on the rear of the D-Link router. Attach the power adapter to the port on the rear of the router and plug the adapter’s cord into a outlet.

3 Remove the power cord from your modem and wait 10 seconds before plugging it back in. This will reinitialize your modem and force it to establish a connection to the D-Link router. Your router will immediately begin distributing a wireless network with the “D-Link” network name.

4 Connect your computer to one of Ethernet ports on the rear of the router and open a Web browser. Type “http://192.168.0.1” into the address bar and press “Enter.” Enter “admin” into the username field and type “admin” again into the password field. Click “OK” to open the wireless configuration page. Click “Wireless Security Setup Wizard” to create a wireless password for your router’s network. Click “Apply” to save the changes to the router’s settings.

SSH Connections

Windows – PuTTyPuTTy: PuTTy is a free application that can be downloaded from chiark.greenend.org.uk

1.In PuTTY, under Session, enter your Domain Name as the Host Name

2.Under SSH, choose 2 from Preferred SSH Protocol Version

3.Under SSH -> Auth in PuTTY, you will need to specify where your private key can be found. Remember this is where you saved the private key on your local computer. Click Browse to locate the file on your computer.

4.If you wish to have your username automatically sent to the server when connecting, under Connection -> Data in PuTTY, you will see a field for “Auto-login username”. Type your account username there.

5.Save your settings to be used in future sessions – Under Sessions, type a name (such as “my site”) in the Saved Sessions box and click Save.

“spooler subsystem app stopped working…”

“spooler subsystem app stopped working…” and found solution that may help you to fix your case.

Somehow vista turn off LDP port after installing new printer driver and leaves only Internet client port only. That why the printer spooler service failed to start. Solution is:

1. Go to Programs and Features in Control panel > click Turn Windows features on or off

2. click + sign of Print services

3. Select LPD and LPR. You should remove Internet Printing Client. > restart your PC to ensure there is no error of spooler service.

4. Add your printer driver again.